
 I put the side back on the cot. I know, I know consistency in parenting is key. Whatever... I'm tired.
Tuesday, April 27, 2010
defeat
I put the side back on the cot. I know, I know consistency in parenting is key. Whatever... I'm tired.

Monday, April 26, 2010
Inferno (not the disco kind)...

Photo (taken by Uncle Ross) from the archives... just some inspiration to remind me why I'm bothering to redecorate
I am convinced that one of the nine circles of hell is reserved for people with bad taste. There, sinners are forced to spend all eternity stripping ugly wallpaper. I've spent the weekend in my own personal hades, attempting to remove the revolting floral wallpaper from my spare room. The previous owners seemed to have some malevolent desire to impose their aesthetic on subsequent owners. Whoever put the wallpaper up used glue as though it was going out of fashion and even went to the extent of wallpapering the cornice. As awful and gruelling as it's been, there is something cathartic about unveiling the blank canvas below. There is still a lot of work to be done but at least all the wallpaper is off now.
In other news, we have taken the side off Minty's cot. Tonight is her first night 'loose' in the house. I've lost count of the number of times I've taken her back to bed. So far she has requested: fruit, baked beans, bread, a drink, the toilet, daddy, a story and lego. I have been cast in the role of 'bad cop', daddy of course is starring as 'good cop'. Touch wood... it finally seems as though she might have fallen asleep, two hours after bed time.
Friday, April 23, 2010
tutu cute

Here are a few shots of our dress up session today. This is the first time Minty has voluntarily worn the tutu I made for her birthday for longer than 2 minutes. I must say it's a bit of a relief. I was beginning to think I had totally wasted my time and all that tulle. I made the tutu extra big so that it would last her a couple of years. She's wearing it as a halter dress here but when she gets a little taller it can be worn as a skirt.
 Here she's wearing the felt crown I made for her first birthday (it has an elastic panel at the back so it still fits).
Thursday, April 22, 2010
Ice cream thesis

For his birthday the man of the house requested ice cream cake. Now ice cream cake always makes me think of the heavily processed multi coloured cakes you get at a McDonald's party or the ever popular Coles 'party cake'. While I agree these cakes have their merits, such as sending small children into a sugar induced coma, I don't really think they add much class to an event and certainly don't say 'I love you sweetheart so I got you this scrumptious cake to show you how special you are to me'. Rather they seem to say something more along the lines of 'I forgot it was your birthday so I ducked out to Coles at the last minute and this is all they had.' Considering I was attempting to imbue a sentiment akin to the former message I decided a home made ice cream cake was in order.
Now let me tell you, dear readers, making an ice cream cake from scratch is not for the faint hearted. You need to allow yourself at least two days and be prepared to wash a phenomenal amount of dishes in no way proportionate to the size of the cake you will finally produce. But if you're prepared for this fasten your seat belts and read on.
Of course you can make the cake ahead of time as it is going to be frozen which will make your life easier. I chose to begin my cake the night before I needed it because sometimes I am well… stupid. If you want to make your life even easier and are prepared to completely cheat you can always buy a punet of ice cream and just assemble the cake. This will avoid most of the dishes but I tend to think this defeats the purpose of making a cake rather than buying one.
The cake I made is primarily composed of mint ice-cream made with home grown mint from our garden and rippled with dark chocolate. The recipe is from David Lebovitz's book 'The Perfect Scoop' (this book rocks and is pretty much the bible if you want to make home made ice cream). The cake has a chocolate cookie base and is topped with dark chocolate ganache.

Preparing the Tin
I used a 6 inch tin because I think small cakes are cute. You could make a bigger cake but just make double the amount of ice-cream (maybe two flavours layered would be nice). I would probably recommend using a spring form tin or at the very least a tin with a base that is removable. If you are daring/insane it is possible to make with a regular cake tin - it just requires a bit more preparation, some prayer and a probable spatter of expletives as you finally attempt to unmould the cake. Whatever the tin you will need to line the entirety (base and sides) with baking paper. If you are using a standard tin I would also recommend inserting a cardboard base below the paper and another long strip of cardboard underneath everything and folded upwards so it protrudes above the sides of the tin. This will give you something to grip and pull on when the time comes to get your baby out of the tin.
The Base
Crush 100g choc ripple biscuits into crumbs. you could do this in the food processor or (my method of choice) just pop them in a zip lock bag and pound them with a rolling pin. Pour 40g melted butter over the crumbs and mix until moist. Pat the crumbs into the base of your lined tin. Cover the base directly with glad wrap and put in the freezer for at least one hour.
The ice cream - Fresh Mint Ice cream from 'The Perfect Scoop'
This makes approx. 1 litre ice-cream
1 cup whole milk
150g sugar
2 cups heavy cream
Pinch of salt
80g fresh mint leaves (this is HEAPS - a perfect way to use up an overgrown mint plant)
5 large egg yolks
Warm the milk, sugar and 1 cup of the cream and salt in a small saucepan. Add the mint leaves and stir until they're immersed in the liquid. Cover, remove from the heat and let steep at room temperature for an hour.
Strain the mint-infused mixture through a mesh strainer into a medium saucepan. Press on the mint leaves to extract as much flavour as possible, then discard the leaves. David (can I call you David or should I stick to Mr Lebovitz?) says the milk will be a lovely shade of emerald. Mine certainly wasn't even close to a colour I would describe as emerald… a slightly yellowy/green pus colour maybe? The flavour was definitely there though so I wouldn't worry too much.
Pour the remaining 1 cup cream into a large bowl and put the strainer on top.
Rewarm the mint-infused mixture. In a separate medium bowl, whisk together the egg yolks. Slowly pour the warm mint liquid into the egg yolks, whisking constantly, the scrape the warmed egg yolks back into the saucepan.
Stir the mixture constantly over a medium heat, scraping the bottom as you stir, until the mixture thickens and coats the spatula. Pour the custard through the strainer and stir it into the cream. Stir until cool over an ice bath.
Chill the mixture thoroughly in the fridge (overnight) and then freeze in your ice cream maker.
If you want to put chocolate through it, simply pour 100g of melted chocolate in a very slow drizzle into the ice cream machine during the last 5 minutes of churning. Be careful not to pour it onto the mixing blade. It hardens and shreds into chips as it stirs.
Add the ice-cream to the tin (obviously take the plastic off the base first), cover directly with another layer of plastic wrap (try to smooth out any air bubbles) and freeze for at least two hours.
The Ganache
Melt 100g of dark chocolate with 100g of heavy cream over a double boiler stirring constantly until smooth. Allow to cool to room temperature then pour onto the ice cream layer of the cake. Put a layer of plastic wrap directly onto the ganache and freeze for at least another two hours.
Unmould and serve!
Wednesday, April 21, 2010
Happy Birthday Mr. Man

Just a quick post tonight because it's the mister's birthday and we're about to watch a movie. I'm just going to share with you some pictures from this afternoon's walk at the nobbies. They're all taken with my point and shoot while holding Turi in the sling and Minty on the leash. It was a little like juggling so forgive any wonkiness.
I have a very exciting ice cream cake post for you tomorrow (although I'm yet to unmould it so perhaps I shouldn't get your hopes up in case it flops!!), so stay tuned!


Saturday, April 17, 2010
black bananas and chalk

Writing sometimes feels like pulling teeth. I used to be able to comfortably trot out 500 words in an hour with time for a cup of tea break and a suitable helping of procrastination. I'm certainly out of practise. I'm still working on some architecture write ups. Tonight I've been trying to write about a house which is apparently a modern interpretation of a Welsh manor house. It would probably help if I knew something about Welsh manor houses... um yeah so it's going well.
I'll stop boring you all with my whinging and share a few pictures from yesterday that I didn't get a chance to post.
Chalk is currently the finger painting alternative of choice...


And in other random musings...
If cakes were celebrities (bear with me here, I promise I'm going somewhere) the black forest cake would be Angelina Jolie, the carrot Miranda Otto, the sponge Scarlett Johanson. And the banana loaf cake is more of a Rachel Griffiths. We won't call her ugly, she's not, but she isn't exactly likely to make it on a list of the world's most beautiful people. A character actress, sometimes unadorned in order to make her more 'believable'. Let's face it, a bad hair cut and sweat pants/ a loaf pan and simple cream cheese frosting can make even the best of us appear dowdy. She could certainly be tarted up with a sprinkling of walnuts, it's a shame nuts are a choking hazard for the two-year-old set.
And so here she is... my dowdy banana cake. The result of some overripe bananas and a bored two year old in need of an activity.

Thursday, April 15, 2010
quilt porn

Ok, so I got an email from my mum this morning asking if I'd seen any lovely, inspiring quilts on the web lately. She's hoping to make a cot quilt for a special little baby who is due to enter the world later this year. I then spent the rest of the day hunting down pictures of things I've stumbled across over the last few months. I now have RSI from too much scrolling - thank you mum! Rather than just emailing the links back to mum I thought I'd share them with you here so that you can all enjoy them.
I've also been dreaming of making new quilts for Turi and Minty if I can find some free moments around here. At least I won't have to do all this hunting for inspiration again later when I finally get around to it. Incidentally, I do try and keep a folder on my desktop where I drag and drop inspiring images as I come across them. I'd really recommend it as it saves a bunch of time later if you want to peek at things again.
The image at the top of this post is from one of my favourite quilters. I really recommend stopping by her blog. It is absolutely inspiring. I L.O.V.E. this one too (found here)...

Next up is film in the fridge. I couldn't choose just one quilt - they are all really special. This and this and this… ok just go to the blog and look at all of them!!
In a similar vein is hand made by Alissa. Check out this and this (see image below).


Oh and the triangles (there's a tutorial for this one here). I'm really thinking of making this one for Turi. By the way, if someone wants to get me Denyse's book for my birthday/mother's day/a random gift to say I love you it would be very well received!!!

Here is another take on the triangle pattern, found here at hop skip jump.

And another variation on this theme - zigzag with a little Anna Maria Horner (found here pattern included). For Minty maybe?

Now I really love the sentiment behind this quilt made for a little boy out of his dad's old shirts.

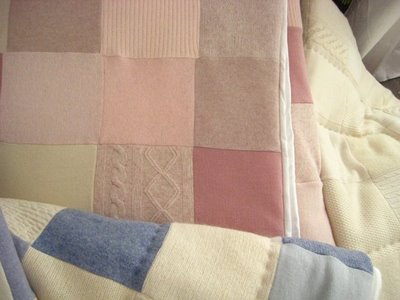
And another take on upcycling fabric, these ones are made from felted jumpers. These might even by my favourites. Don't they just look amazingly snuggly? You have to go to the web site and see all the other lovelies!
And last but not least, check out this simple quilt made with Amy Butler fabrics.
I hope you're feeling as inspired as I am!
Subscribe to:
Posts (Atom)

 Posts
Posts

